Soundproof Foam: Does It Really Work?
Soundproof foam is a misnomer. The open‑cell polyurethane wedges you see in studios are acoustic foam panels that absorb echo inside a room; they do not block noise traveling through walls.
If your goal is to quiet a room, look at mass, airtightness, and decoupling (see soundproofing vs absorption). For taming flutter echo or improving voice‑over quality, foam is a budget‑friendly option.
Key data: Acoustic foam NRC values (ASTM C423) range 0.4–1.1 depending on thickness and profile (Auralex Studiofoam datasheet). STC ratings for a wall with foam alone remain unchanged (see STC guide).

As an affiliate, I may collect a share of sales or other compensation from the links on this page.
How Acoustic Foam Works
Open‑cell foam converts sound energy into heat by friction as air moves through the pores. Labs measure absorption in one‑third‑octave bands (ASTM C423) and summarize as NRC. Thickness and profile (wedge vs pyramid) affect low‑frequency absorption: 2″ wedges NRC ≈ 0.65; 4″ pyramids NRC ≈ 0.95 (Auralex data).
Acoustic foam is often mistaken for soundproof foam because many people do not know the difference. In fact, many manufacturing companies market and sell these foam panels as soundproof foam.
Where Foam Helps (and Where It Doesn’t)
- Helps: Reducing flutter echo in podcast rooms, improving speech clarity for video calls, lowering reverberation time for home studios.
- Doesn’t help: Stopping loud neighbors, blocking traffic noise, preventing bass transfer through shared walls. For that, add dense barriers or decoupling layers.
Types of Soundproof Foam (So Called) Explained
- Pyramid / wedge acoustical foam: Polyurethane or melamine; NRC rated; studio standard.
- Egg‑crate mattress foam: Cheap, flammable, inconsistent density; poor absorption data—avoid.
- Spray expanding foam: Fills gaps for air sealing, but density too low to add meaningful mass; boosts STC only when used inside double‑stud cavities.
- Memory foam panels: More for décor; tests show NRC < 0.4 at 1″.
- Melamine foam clouds: Lightweight, Class A fire rating (see fire rating overview); good for ceiling absorbers.
Mass-Based Solutions for Soundproofing

Soundproof foam is a myth. You need alternatives and here are a few.
Double Drywall with Green Glue
The most cost-effective upgrade involves adding a second layer of 5/8″ drywall with viscoelastic damping compound (Green Glue) between layers (see budget soundproof room).
This sandwich construction typically boosts wall STC from 33 to 48-52. Apply one tube of Green Glue (Amazon) per 16 sq ft, spreading in random squiggles before mounting the second drywall layer. Allow 7-10 days for full cure and maximum damping effect.
Mass Loaded Vinyl (MLV) Barriers
MLV provides pure mass without thickness—1/8″ sheets deliver STC 26, while 1/4″ versions reach STC 32. Install MLV behind drywall for best results: staple it limp to studs (creating the “limp mass effect”), seal seams with acoustic tape, then hang new drywall. Surface-mounting MLV reduces effectiveness by 15-20% but works for quick retrofits.
Concrete Masonry Units (CMU)
For permanent construction, 8″ hollow CMU blocks filled with sand achieve STC 55-60. While expensive and labor-intensive, CMU walls provide superior isolation for home theaters or music studios where maximum sound blocking justifies the cost and space requirements.
Decoupling Systems

Resilient Channel Installation
Metal resilient channels break the mechanical connection between studs and drywall, reducing vibration transmission. Install channels perpendicular to studs every 24″ on center, ensuring channels don’t touch adjacent framing. Combined with MLV and Green Glue, resilient channels can push STC ratings into the 60s for critical applications.
Double-Stud Wall Construction
Building two separate 2×4 stud walls with a 1″ air gap eliminates direct contact between room surfaces (staggered vs double wall). Each wall carries its own drywall, with the gap filled with mineral wool insulation. This approach delivers STC 65+ but requires 8-9″ of wall thickness—ideal for new construction or major renovations.
Isolation Clips and Hat Channel
Modern decoupling systems use rubber isolation clips with hat channel to suspend drywall from framing. Systems like RSIC-1 clips achieve higher STC ratings than resilient channel while being easier to install correctly. Expect STC improvements of 15-20 points over standard construction.
Advanced Composite Materials

Cork-Based Sound Barriers
Natural cork panels offer excellent sound absorption (NRC 0.7-0.85) plus moderate sound blocking when used in 1/2″ to 1″ thicknesses. Cork’s cellular structure traps sound waves while providing thermal insulation benefits. Available as tiles, sheets, or rolls, cork installs with construction adhesive and works well in eco-conscious projects.
Rubber Composite Sheets
Recycled tire rubber combined with binding agents creates dense, flexible sound barriers achieving STC 45-55. These materials excel at impact noise reduction—perfect for gym floors, apartment units, or anywhere footfall noise is problematic. Most rubber composites come in 4×8′ sheets or 2×2′ tiles for easy handling.
Hemp and Wool-Based Panels
Natural fiber panels made from hemp (NRC 0.85-0.95) or sheep’s wool (NRC 0.90-1.0) provide superior absorption while remaining non-toxic and sustainable. These materials naturally resist fire, mold, and pests while regulating humidity. Though more expensive than foam, their longevity and environmental benefits often justify the investment.
Budget-Friendly Alternatives
Heavy Moving Blankets
Professional-grade moving blankets (4-6 lbs each) can temporarily reduce echo and reverberation when hung on walls or used as portable barriers. While less effective than purpose-built materials, they cost $20-40 each and work well for temporary recording setups or rental properties.
Thick Curtains and Drapes
Multi-layer curtains with dense fabric can absorb mid and high frequencies effectively. Look for curtains with multiple layers, heavy fabric (velvet, canvas), and foam backing. Install on wraparound rods extending 6″ beyond window frames to maximize coverage.
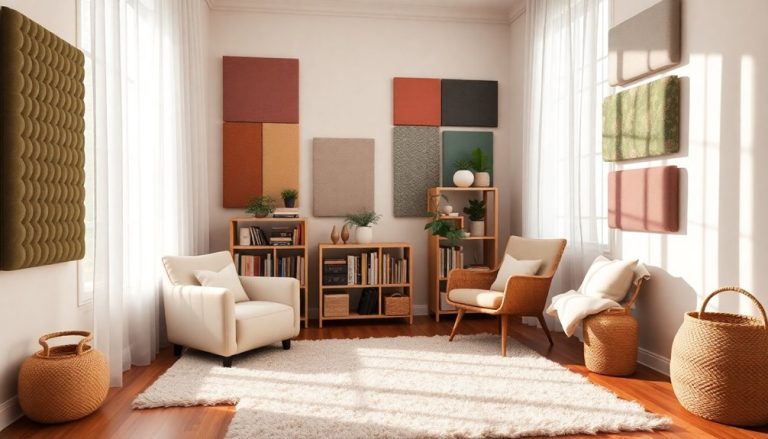
Bookcases and Furniture
Strategically placed bookcases filled with books create irregular surfaces that scatter sound waves while adding mass to walls. The key is irregular spacing—avoid uniform shelving that can create resonances. Combine with soft furnishings (couches, cushions, rugs) for broad-spectrum acoustic treatment.
Scientific Placement Methods for Acoustic (Not Soundproof) Foam
The Mirror Test for First Reflection Points
Sit in your primary listening position while a helper moves a mirror along the wall. Mark every spot where you can see your speakers’ drivers in the mirror—these are your critical first reflection points requiring foam treatment. This method identifies the precise locations where sound waves bounce off walls before reaching your ears, causing comb filtering and stereo imaging problems.
Impulse Response Mapping
For advanced users, play pink noise through your speakers while moving around the room with a sound level meter or smartphone app. Note areas where the sound becomes noticeably louder or develops a “fluttery” quality—these indicate strong reflections requiring absorption. Map these problem zones for targeted foam placement.
Standing Wave Calculation
Calculate your room’s standing wave frequencies using the formula: frequency = 1125 / (2 × room dimension in feet). For a 12′ dimension: 1125 / 24 = 47 Hz. Odd multiples (47, 141, 235 Hz) create nulls at room center, while even multiples create peaks. Position bass traps at corners where these modes are strongest.
Room-Specific Placement Strategies

Home Studios and Recording Spaces
- Behind monitors: 4-6 panels directly behind speakers to reduce rear reflections
- Side wall reflection points: Use mirror test, typically 3-4′ from monitors
- Recording area: Create a “dead end” behind microphones with 50-70% wall coverage
- Ceiling cloud: 4×8′ panel above mixing position to control vertical reflections
- Corner bass traps: Floor-to-ceiling in all four corners, minimum 4″ thick
Home Theaters and Media Rooms
- Behind screen: Absorb reflections from projection screen with 2″ wedge foam
- Side walls: First reflection points at ear level (42″ seated, 60″ standing)
- Rear wall: Diffusion rather than absorption to maintain spaciousness—use pyramid foam in checkerboard pattern
- Ceiling: Strategic panels above seating area, avoid over-treatment that kills surround effects
Office and Conference Rooms
- Opposite talking areas: Place foam where voices project most frequently
- Corner placement: Reduce bass buildup with 2″ foam or dedicated bass traps
- Ceiling treatment: 25-30% coverage to control general reverberation
- Height consideration: Mount at 5-6′ for standing meetings, 4-5′ for seated conferences
Podcast and Streaming Setups
- Behind microphone: Create absorption “shadow” 2-3′ behind mic position
- Surrounding treatment: Semi-circle of foam panels 3-4′ from recording position
- Ceiling panels: Single large panel directly overhead to eliminate slap-back echo
- Portable options: Freestanding foam panels on stands for flexible room arrangements
Installation Height and Spacing Guidelines
Optimal Height Placement
- Seated rooms: 4-5′ from floor aligns with ear level for most people
- Standing areas: 5-6′ mounting height for typical adult ear level
- Mixed-use spaces: Mount at 4.5-5′ as compromise height
- Studio monitors: Align foam center with tweeter height, typically 48-54″
Horizontal Spacing Recommendations
- Maximum gap: No more than 2 panel widths between adjacent panels
- Minimum coverage: 15-25% of wall surface area for basic echo control
- Optimal coverage: 30-50% for critical listening environments
- Over-treatment warning: Avoid exceeding 60% coverage—creates overly dead acoustics
Coverage Percentage Guidelines
- Light treatment: 15-20% coverage for basic echo reduction
- Standard treatment: 25-35% for general purpose rooms
- Heavy treatment: 40-50% for critical listening or recording
- Maximum treatment: 60% ceiling—beyond this creates unnatural acoustics
Advanced Installation Techniques
Air Gap Installation
Mounting foam 1-2″ away from walls improves low-frequency absorption by creating an air cavity. Use furring strips or specialized standoff hardware. This technique effectively doubles the foam’s apparent thickness for low-frequency performance while using the same amount of material.
Alternating Pattern Placement
Stagger foam panels on parallel walls so bare spots on one wall align with panels on the opposite wall. This prevents flutter echo between parallel surfaces while using 50% less material than full coverage.
Layered Installation for Bass Control
In corners, layer different foam types: place 4″ bass trap foam directly in the corner, then add 2″ wedge foam 6″ in front of it. This creates a gradient absorption system that handles both bass frequencies and mid-range reflections effectively.
Removable Installation Options
For rental properties or temporary setups:
- Velcro strips: Industrial-strength Velcro allows easy removal without wall damage
- Command strips: 3M Command strips rated for appropriate weight
- Magnetic systems: Magnetic backing works on metal studs or with metal plates
- Tension rod systems: Floor-to-ceiling poles with foam panels for completely damage-free installation
Troubleshooting Common Placement Mistakes
Over-Treatment Symptoms
- Conversations sound muffled or “dead”
- Music lacks liveliness or spatial dimension
- Difficulty localizing sound sources
- Solution: Remove 20-30% of panels, focus on first reflection points only
Under-Treatment Indicators
- Persistent echo or slap-back when clapping
- Difficulty understanding speech clearly
- Harsh, fatiguing sound quality
- Solution: Add panels at reflection points, consider thicker foam for low frequencies
Incorrect Height Placement
- Treatment ineffective despite adequate coverage
- Frequency-specific problems (boomy bass, harsh highs)
- Solution: Measure actual ear height in typical use positions, remount accordingly
FAQs
Does acoustic foam block sound?
No—foam absorbs echo inside the same room. To block transmission, increase wall STC with mass and decoupling (STC explained).
Is thicker foam always better?
Up to a point: 4″ foam absorbs lower mids better than 1″, but beyond 4″, gains drop off. For bass, switch to dense mineral wool traps.
Can spray foam stop noise between rooms?
Slightly—by sealing air gaps—but its density (≈2 lb/ft³) is far lower than drywall (50 lb/ft³). Treat it as air sealant, not mass.
What NRC should I aim for?
Look for NRC ≥ 0.65 at 2″ thickness; 0.8+ is ideal for speech‑range absorption (Auralex lab data).
Where can I buy Class A fire‑rated acoustic foam?
Look for melamine‑based panels (e.g., illbruck/Whisperwave). Always verify ASTM E84 Class A in the datasheet.