Guide to Building a Soundproof Drum Shed
Every musician longs to play freely without the concern of bothering others or having their sessions interrupted by a bothersome knock from irritated neighbors.
Particularly when you’re a passionate drummer, simply keeping the noise down just isn’t practical for a solid practice session. Check out my article on how to soundproof electric drums.
Whether you’ve eyed a spot on your premises and are building a soundproof drum shed from scratch, or want to modify an existing shed and turn it into a soundproof drumming sanctuary, there are quite a few ways to achieve the goal.

Stick around to find out how to establish a soundproof drum shed where you can rock out with peace of mind.
As an affiliate, I may collect a share of sales or other compensation from the links on this page.
How to build a soundproof drum shed
Establishing a soundproof drum shed can be done via a combination of methods, all of which will be more effective when certain measures are taken in succession and methods are used in combination with each other.
Drums, in particular, pose unique and varying challenges, since they generate a wide range of frequencies with 110 – 120dB peaks and plenty of low frequencies from bass kicks and drums.
This makes it particularly challenging to isolate noise entirely, and there will need to be airtight construction, plenty of mass around the perimeter, and the room should be decoupled from the rest of the structure for the most effective results.
If you’re renovating or constructing the drum shed on your own property, then there are a few methods that can be done to the walls and ceiling prior to the rest of this list.
1. Build a room within a room
You could also go for a complete decoupling approach by building a room within a room with at least a 2-inch gap between surfaces, decouple the sheetrock from the framing of the walls using resilient channels, resilient sound isolation chips, and adding a layer of drywall.
An additional layer of drywall can then be added with Green Glue and insulation, insulating the walls, ceiling, windows, and door.
If this is done correctly, then the room will be airtight which will be a far better starting point for further soundproofing methods, but it may require investing in a ventilation system – which can be soundproofed as well for optimum effectiveness.
A false floor can be added with sound-absorbent material, which will reduce the impact of noise traveling through the floor.
Although such methods will be more expensive, it will certainly be effective. If the shed is existing, then a professional should be contacted before renovating the shed, since it may pose safety risks depending on how old or fragile the structure is.
All-electric systems and cables for lighting and equipment are accounted for or before going ahead with any of the methods.
If you are trying to soundproof a shed without construction, or want to further soundproof after construction/ renovation, there are quite a few ways in which soundproofing a shed can be done.
But, the basis of the shed will need to be assessed as there may be vulnerabilities within the structure itself that allow for soundwaves to escape and travel through mediums. These vulnerabilities would need to be resolved, as this will improve the effectiveness of further methods.
2. Fill cracks or holes with Acoustic Sealant

While sound travels through impact with mediums, one of the largest conductors for sound is air. Airborne soundwaves will seek out any cracks or holes through which they can travel and resonate, and filling these cracks is an ideal way to start the soundproofing process.
Acoustic sealant
This is simple to use and relatively inexpensive. It should be loaded into a caulk gun, and the areas of sound leakage should be focused on first.
This includes visible cracks or holes in the walls of the shed, the perimeter of the windows, and the areas where the door frames meet the wall.
A draft test can be done to identify further leakages for air, and thus leakages for sound. The shed should be airtight if there are no cracks or holes.
When it comes to filling cracks in walls, it may be hard to identify since drafts may not be noticeable through these cracks.
Other areas of concern will be corners of the room, and areas where the walls meet the ceilings and floors. Sound will travel through even the tiniest cracks that it can find, and filling these prior to further soundproofing methods will make a massive difference.
3. Soundproof the Windows
Read my guide on soundproofing windows
Windows offer great natural light and fresh air post band practice, but they do pose various weaknesses to sound leakage.
If the material is too thin, the physical composition of the windows may be easy to act as a medium for sound, even when they are closed.
If possible, you can opt for removing the windows entirely. But, if you’re keen on keeping them, there are a few ways to reduce their capacity for sound leakage.
Weatherstripping Tape
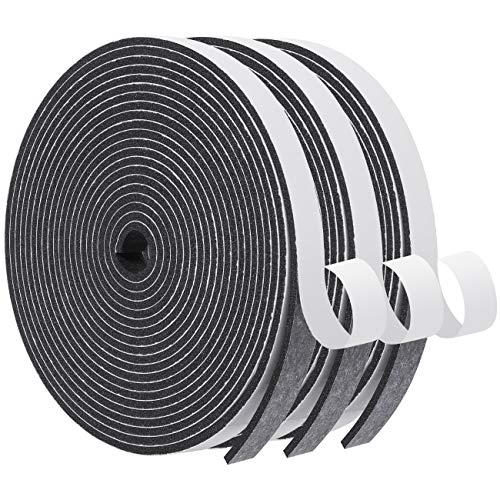
In addition, there may be gaps in flanking between the window frames and walls. Weatherstripping tape is useful for relieving this issue, as the thin strip of rubber helps close the gap between the window and its frame allowing it to lay flush against the wall and prevent soundwaves from escaping.
This is cost-effective and quite simple to use since most weatherstripping tape is adhesive which makes it easy to apply.
The tape should be cut according to the summative measurement of the window and attached to the entire perimeter of the window.
Weatherstripping may not be enough if there is a larger gap that needs to be resolved, and an undersized draft stopper may be needed.
Window Inserts
These are clear panels of glass or acrylic which are installed over existing windows, and are a great option for blocking sound but not natural light, particularly if installed windows are very thin.
These are uniquely designed in order to create an airtight seal which reduces noise transmission by approximately 50%. Some window inserts are removable, which leaves the option to detach them when you’d like some fresh air.
Although it’s pricey, switching to UPVC may be a good idea if the window glass is thin, as these have much better sound absorption than glass.
A more cost-effective alternative is to get double-glazed windows, which consist of two panes of glass separated by a gap which makes it harder for sound to pass through it.
4. Soundproof the Doors
Read my guide on soundproofing doors
If the doors are light and hollow, it could be a good idea to switch for doors that have heavier and denser properties, as this will result in it being harder to act as a medium.
Soundproof doors do exist but are really hefty in weight and cost. This should also be considered against the properties of the shed, as heavy doors may be too much for an old or fragile structure.
Weatherstripping Tape
The gaps around the door and the frame will still be the main area of concern for sound escaping the shed. Weatherstripping tape is handy for sealing gaps around the door as well and would be applied in the same way as it’s applied for windows.
Draft Stoppers
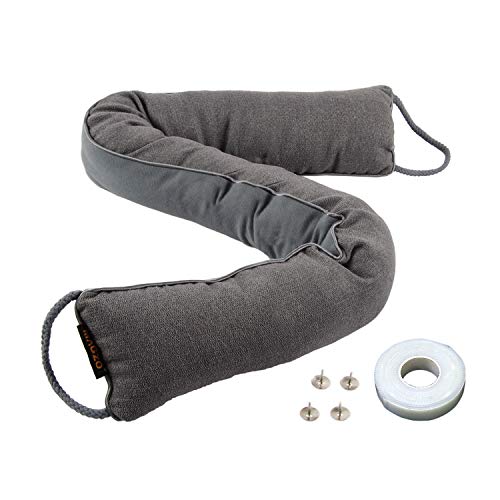 These are designed to block the gap between the door and the floor, stopping the flow of air and thus the medium for airborne noise.
Some are designed to be fixed in place and attached to the door and DIY versions can be made on a low budget, but getting a quality version will be more effective at keeping your beats inside your drum shed.
Mounted Door Seals
These can be bought online, and although they are more expensive, they are more effective if blocking noise and provide a more permanent soundproofing solution.
Soundproofing Air Vents
Read my guide on soundproofing air vents
This can be a massive source of sound leakage, as the overall design of air vents makes it particularly easy for soundwaves to travel through it.
If the shed has been made airtight through construction, then an air vent system may need to be installed – which would need to be soundproofed as well for the best results.
Flexible Pipes
Using flexible ducts will dampen sound better, and won’t act as a medium for soundwaves as easily.
Seal Gaps
Applying acoustic sealant around the vents will reduce the travel of sound vibrations that pass through the wall and travel through the vent to the outside of the shed.
Soundproofing Composite
This will reduce the amount of sound that makes it through the vent through absorption, and the vent should be lined with this composite.
Sound Baffles
This uses its maze-like structure to trap sound waves. One of these can be installed on the duct to stop noise from exiting or entering, but it’s not too visually appealing.
5. Soundproofing the Walls

The method by which the walls and ceiling will need to be soundproofed will greatly depend on the type of shed, its composition, and its density.
The principles of absorption, mass, decoupling, and dampening should be used in combination with each other in order to prevent soundwaves from escaping the shed.
Drywall Layers and Green Glue

This is done by coating drywall in Green Glue before putting it up directly over the current wall with decoupling mounts.
This noise-proofing solution is designed to dampen sounds and act as an acoustic barrier, and multiple layers of drywall can be added. This method is costly, but adds mass to the wall through-thickness and density, and would fill any nonvisible cracks still remaining.
MLV
Mass Loaded Vinyl can be used on drywall or QuietRock with Green Glue in between layers, and will be effective in reducing the overall noise transmission.
It can be positioned slackly as well as when fixed firmly against the surface and is an exceptional solution for soundproofing due to its source of non-resonant mass.
However, it should be noted that this will predominantly be based on the construction of the shed, and a professional should be contacted to evaluate the existing walls and assess if adding drywall and MLV layers will be safe for the structure.
If the walls cannot withstand the process, then acoustic foam panels should be used instead, or MLV on top of walls.
Acoustic Foam Panels
Adding this to the walls, particularly if the walls have been modified with drywall and Green Glue layers, will reduce the amount of noise leaving the room. But, this is a great option when drywall is not applicable, as they are soft, spongey, and are lightweight.
The best results will come from covering the surface area in the shed, in order to reduce resonating frequencies and soundwaves which bounce around the space. However, they do collect dust easily.
6. Soundproof the Ceiling
Read my guide on soundproofing ceilings
The ceiling should be tackled in the same way as the walls, with drywall and Green Glue and/or MLV, after which the ceiling can be covered in acoustic foam. Ceiling clouds can also be used if there are a sufficient budget and enough space in the shed.
Drop Ceilings
These are an effective way of stopping sound from leaving the shed through the ceiling and roof, using resilient channels and insulation. But, this is costly and needs a larger shed interior space with a stronger shed structure.
7. Soundproof the Floor
Read my guide on soundproofing floors
A good option would be soundproof underlayments or anti-vibration mats for impact noise from drumming. Soft memory foam underlays can also be added without lifting up the floorboards and covered with carpet.
8. Add Bass Traps

Even with all of these methods combined, very low frequencies which are prominent in drumming will be persistent in their transmission.
Using bass traps will prevent sound from escaping and from bouncing around within the shed. They are simple to use and should be attached to each corner of the shed.
Check out my guide on installing bass traps.
How to furnish your drum shed
Soft Furnishing
Although the furniture is not soundproof, every single object has sound conducting properties, and sound conducts better with flat or smooth surfaces.
Furnishings like shag rugs and rubber textile mats will provide further absorption for sound within the shed room, as will soft furniture.
Sound-absorbing Curtains/ Noise Cancellation Curtains
For soundproofing the windows and doors even further, one could add sound-absorbing curtains which act as a barrier between the soundwaves and the surface, and reduce the amount of sound escaping from the shed.
Density Rug Pads
These are quite handy for lessening the vibrations and echo caused by drumming. These can be slipped underneath carpets and rugs to increase cushioning and absorption ability, resulting in less vibration being transmitted toward the floor.
Soundproof Paint
Soundproofing paint is comprised of fillers, hollow ceramic microspheres, and resins which are sound absorbent, and can be painted onto the walls and ceiling of the shed-like standard paint.
It’s simple to apply since it merely necessitates a paint roller for large surface areas and an angled brush for smaller areas and crevices.
A minimum of two layers should be applied for effective results, as it works by adding dense mass to the surface, dampening sound, and reducing noise by up to 30%.
There are ultimately a variety of ways in which to soundproof a drum shed. The most effective soundproofing approaches should be a combination of these methods in succession, and establishing soundproofing by resolving vulnerabilities within the structure itself is always the best place to start.
By utilizing these methods in comparison to the specifications of the existing shed or property, time availability, and budget plan, you can create a soundproof drummer’s sanctuary without the worry of disturbing those around you.


